Showing posts with label bread. Show all posts

Easy Whole Grain Flatbread

Sunday, January 19, 2014


What I like about Mark Bittman's recipes is that they are flexible, simple, and can be changed up easily.

This one seemed way too simple to taste good. But I had to try it. It is absolutely amazing! Even as I poured the pancake-y batter into the pan of oil and onions, I was thinking "there is NO Way this is going to turn out." Halfway through baking I looked in and thought "wow, that looks oily." Once it was finished baking, however, the crisped edges were very promising--and once I took a bite, I was immediately sold. WOW!

What a tasty and simple bread, perfect with soup, salad, pasta, or whatever else you are eating. The onion and the rosemary (I used a sprig that I'd taken from the garden and dried) gave the bread incredible flavor. I can't wait to try cornmeal, and if I can find it, chickpea flour, along with other herbs.

*note: My batter soaked for 4 hours. I used a 10 inch oven-safe skillet, and cut the oil down to a scant 3 T. I think I could have done well with even less oil.


Easy Whole Grain Flatbread

Ingredients
1 cup whole wheat flour OR cornmeal, OR chickpea flour (also called besan; sold in Middle Eastern, Indian, and health food stores)
1 t. salt
4 T. olive oil 
1/2 large onion, thinly sliced (optional)
1 T. fresh rosemary leaves (optional)

1. Put the flour into a bowl; add salt; then slowly add 1 1/2 c. water, whisking to eliminate lumps. Cover with a towel, and let sit while the oven heats, or as long as 12 hours. The batter should be about the consistency of thin pancake batter.

2. When ready to bake, heat the oven to 450 F. Put the oil in a 12-inch rimmed pizza pan or skillet (along with the onion and rosemary if you're using them) and put in the heated oven. Wait a couple of minutes for the oil to get hot, but not smoking; the oil is ready when you just start to smell it. Carefully remove the pan (give the onions a stir); then pour in the batter, and return the skillet to the oven. Bake 30 to 40 minutes, or until the flatbread is well browned, firm, and crisp around the edges. (It will release easily from the pan when it's done.) Let it rest for a couple minutes before cutting it into wedges or squares.

Naan

Saturday, March 9, 2013

                                 
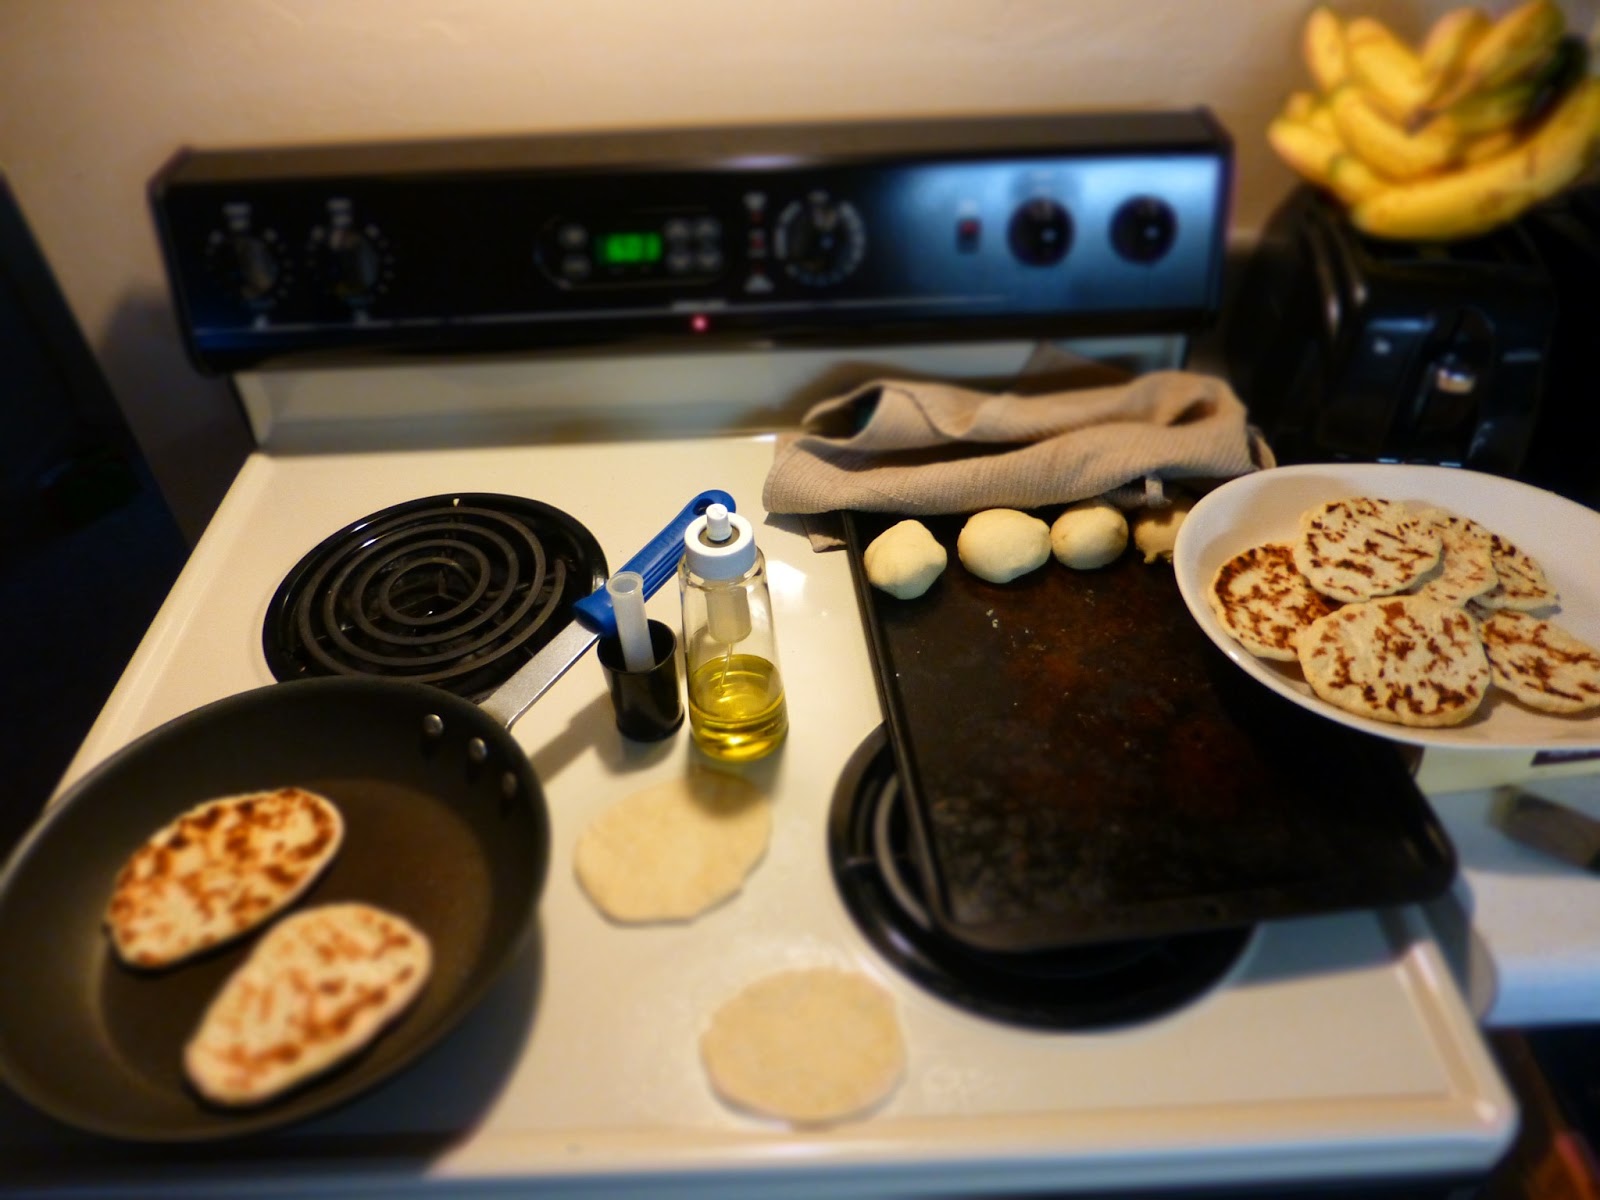
I only recently heard of Naan, when I started to look into more Indian-style dishes. I finally tried it, and though this recipe may not be official in any way shape or form, we loved the flavor and it went perfectly with our Tikki Masala. I am open to trying different recipes, but I had to get this one down because it turned out so beautifully! I had to tweak the cooking directions a bit because I wasn't using a grill or a grill pan. I used a good old non-stick pan, turned up the heat, and misted the pan with my oil mister each time I put two more breads on. Then coated the open side with oil, waited for just the slightest bit of bubbling (takes only a minute or two) and flipped it over for another minute or two.


Naan (adapted from allrecipes.com) original recipe here

Ingredients:
1 package active dry yeast (2 1/4 t.)
1 c. warm water
1/4 c. white sugar
3 T. milk
1 egg, beaten
2 t. salt
4 1/2 c. bread flour
optional: 2 t. minced garlic, melted butter, various herbs

1. In a large bowl, dissolve yeast in warm water. Let stand about 10 minutes, until frothy. Stir in sugar, milk, egg, salt, and enough flour to make a soft dough. Knead for 6 to 8 minutes on a lightly floured surface, or until smooth. Place dough in a well oiled bowl, cover with a damp cloth, and set aside to rise. Let it rise 1 hour, unil the dough has doubled in volume.

2. Punch down dough, and knead in garlic (this is optional. I did not use garlic. You could also knead in other herbs or flavorings). Divide dough into 14 pieces (I cut the dough in half, then cut those halves in half, then...you get the idea). Roll the pieces into balls, lay out on lightly oiled baking sheet or cutting board, and cover loosely with a towel. Let rise for 15-30 minutes.

3. During the second rising, preheat grill to high heat.

4. At grill side, roll one ball of dough out into a thin circle. Lightly oil grill. Place dough on grill, and cook for 2 to 3 minutes, or until puffy and lightly browned. While cooking, I spritzed olive oil on top. Flip the breads and cook another 2 to 4 minutes. Remove from grill and continue the process until all the naan has been prepared. (original recipe calls for melted butter to be brushed on, but I'm more of an olive oil fan to keep a few calories at bay. I am sure the melted butter would send the flavor over the EDGE!)

Watch me make it ;)
The dough, cut into pieces

After rising for 30 mins, they are ready to cook.


Here is the setup..while two breads cook, I flatten two more. The process goes very quickly.
So good with Chicken Tikka Masala. Recipe to come soon!


Crunchy Breadsticks

Saturday, February 9, 2013


I was so excited to find a recipe for breadsticks that turn out with a nice crispy crunch! I made them with black sesame seeds because, oddly enough, I had those on hand (from a recent fascination with homemade sushi). You could make the breadsticks plain, or use poppy seeds, or even roll in parmesan and garlic before baking. I plan to try a few different ways with these!

NOTE: This is the exact recipe from the Homemade Pantry. She has written it with the assumption that you have a stand mixer (which is fine, I wish I did have one, but I don't). I did everything by hand and it was not difficult. In fact I had helpers, as you can see from the pictures that follow. ;) Also, I cut the recipe in half with no prob.

Crunchy Breadsticks
(from The Homemade Pantry by Alana Chernila)

1/2 t. sugar
2 t. active dry yeast
2/3 c. warm water (between 100 and 110 degrees F)
2 c. (10 oz) all purpose flour
1 1/2 t. salt
2 T. olive oil
2 T. poppy or caraway or sesame seeds

1. Combine the sugar and yeast with the warm water in the bowl of a stand mixer (again, note that I do not have a stand mixer, and did everything by hand with no issues), and let sit for 5 minutes. It should be slightly foamy. Add 1 1/4 c. of the flour and the salt and olive oil. Mix for 5 minutes on medium speed using the paddle attachment.

2. Dust the counter with the remaining 3/4 c. flour. Turn the dough out onto the counter and knead the additional flour into the dough for 3 to 4 minutes, or until the dough is smooth and has lost most of its stickiness. Put the dough into a greased bowl, cover with plastic wrap, and allow it to rise until doubled in size. This will take 1 to 2 hours depending on the temperature in your kitchen.

3. Punch the air out of the dough with one swift punch, and turn the dough out on a floured counter again. Sprinkle the seeds onto the dough; then knead them into the dough for about 1 minute. Cover the dough with plastic and let rest for 5 minutes.

4. Remove the plastic wrap and set it aside. Divide the dough in half, then halves again, and then halves again. Repeat until you have 32 roughly equal pieces. Lay the plastic wrap over the balls of dough and set up your baking sheets, lined with parchment paper. Take each ball of dough, one at a time, and roll it between your hands until you have a breadstick that is about 8 inches long and no more than 1/2 inch in diameter. lay the breadsticks on the tray with 2 inches between them. Let rest uncovered for 30 minutes. Meanwhile, preheat the oven to 325.

5. Bake the breadsticks for 35 to 40 minutes, or util they are slightly golden. Let cool entirely before storing.

Storage: Room Temp: covered container, 7 days
              Freezer: freezer-safe container or bag, 3 months (recrisp in a 375 oven for 5 minutes)


Whisk Burger Buns

Monday, May 28, 2012


Another recipe I made when I was out of something in the kitchen (this has been happening more and more--and I have been learning to make a lot of things from scratch out of necessity!). We needed buns for sandwiches, and I had forgotten them on my grocery trip. So I thought I'd try out this recipe I had bookmarked in "Wildly Affordable Organic".  It does take time, but not a ton of effort. I used a bread machine to mix the dough because it is pretty sticky--you could use a food processor with the dough hook, too.


Whisk Burger Buns

Active time: 30 minutes
Total time: 3 hours
Makes 12 buns

1 1/2 c. warm water
3 T. butter, melted
1 egg plus 1 egg white (save extra yolk for glaze)
3 1/3 c. plus 2 t. all purpose flour
1 1/2 c. white whole wheat flour
1/4 c. sugar
1 T. salt
1 T. plus 1 1/2 t. rapid rise yeast (2 packets)
2 t. oil for plastic wrap

Glaze
1 egg yolk
1 T. water
2 T. sesame seeds, optional

1. Combine all dough ingredients in a big bowl and stir to mix. Put extra egg yolk in a small bowl and refrigerate until needed for the glaze.
2. Knead dough using a bread machine or a stand mixer fitted with a dough hook for about 8 minutes or knead by hand for about 10 minutes. Dough will be very soft, sticky, and smooth.
3. Oil a big clean bowl and put dough in to rise. Cover with a plate or lid so it doesn't dry out. Let dough rise for an hour or so until it has doubled in size.
4. Line two cookie sheets with parchment paper or grease the sheets. Oil or flour your hands just enough to keep dough from sticking. (Too much flour will make the buns tough). Put dough on a floured surface and cut into 12 even pieces. Shape each piece into a ball and then flatten. Space dough disks evenly on cookie sheets, 6 buns to a sheet..
5. Oil plastic wrap and cover each cookie sheet, stretching it barely tight to keep the buns from rising too high. Let rise for 30 to 40 minutes, until they have doubled in size.
6. Position two oven racks in the middle of the oven with enough room to put one set of buns on the lower rack without touching the rack above. Preheat oven to 375.
7. Carefully remove plastic wrap. Add water to egg yolk and whisk until smooth. Use your fingers or a brush to coat buns gently with glaze. Sprinkle glazed buns with sesame seeds if desired. Bake for 12 to 15 minutes until golden brown.
8. Remove buns from the oven. Transfer to a wire rack to cool completely. Slice crossways with a serrated bread knife before serving. Keep extra in container at room temperature or wrap well and freeze.

Source: Wildly Affordable Organic by Linda Watson

Olive Focaccia

Saturday, January 14, 2012


I'm not sure where focaccia has been all my life...but now that I've found it, I'm hooked! What a delicious and versatile bread. It's good plain, with soup, or sliced and made into the world's best grilled sandwich ever (or if you are fancy and have a panini maker, a panini--but I'm still in plain-old-grilling-on-a-skillet-phase). It's a fun bread to make, too, especially when you get the part when you dimple it (with your fingers or the end of a wooden spoon), and put olives and herbs into it. I love this recipe, and would love to try putting little hunks of garlic into the dimples before baking it...and experiment with different herbs. Perhaps fresh tomatoes and cheese to make a thick pizza-bread. So many options!

Here is a loaf, looking all dimply before letting it rise.


Olive Focaccia

Ingredients

2 T. yeast
4 c. flour (I love mixing up flours...I have been using 2 c. white whole wheat, 1 c. stone ground whole wheat, and 1 c. unbleached all purpose)
2 c. warm water
1/4 c. pitted olives (or more...)
2 T. olive oil
1 T. fresh rosemary
kosher salt
1 T. each flour and sugar for proofing yeast

1. Proof the yeast by mixing it with the water, and 1 T. each sugar and flour. Let it sit for 10 or 15 minutes; if it's nice and frothy, the yeast is good.

2. Once the yeast is proofed and foaming, add the olive oil and enough flour to make a slightly sticky wad of dough (I use slightly heaping cup measures and the dough is still VERY sticky). You want it to be workable enough to knead for 10 to 15 minutes. I have to add a few small handfuls of flour, and oil my hands, while kneading to keep from sticking too much. This can be done with the dough hook of a big stand up mixer (one of my dream cooking toys that maybe I'll have one day...but for now, my hands get lots of kneading exercise!).

3. Put dough into oiled bowl, cover with towel, and let rise for up to 2 hours, until doubled. This usually only takes 1 hour for me. After the dough is nice and puffed up, turn it out onto a piece of parchment paper, knead lightly while shaping into a rectangle, or oval (or any shape), about an inch thick. Transfer the loaf to a baking sheet by picking it up with the edges of the parchment paper.

4. Now for the fun! Take the end of a plastic or wooden cooking spoon (or use fingertips) to dimple the bread all over. Slice olives in half and press into dough, then sprinkle fresh rosemary (or thyme, or sage, or any herb you want) into the dimples. Brush olive oil all over it, then sprinkle with salt (I like to use kosher because the flakes are nice and big).

5. Allow your focaccia loaf to rise until doubled, then bake at 350 degrees for 25-30 minutes, or until golden brown.

Tip: The olives in the bread start looking 'gunky' and kind of gross after just a couple days. They are still fine to eat, but just don't look as good as when the loaf is super fresh. If you don't think you are going to eat it all in one day, cut into sandwich size pieces and freeze. Each hunk will thaw perfectly in the microwave at a minute or so of cooking.

Here is a pic of a hunk of the focaccia--sliced in half, olive oil sprayed on the flat, sliced sides and then grilled with chicken and cheese inside. Then fresh lettuce placed inside after grilled. YUM! There are so many ways you could fill/grill a sandwich like it.
Source: The Quarter Acre Farm by Spring Warren

Breakfast Muffins

Friday, December 9, 2011


Here's the first recipe I actually created myself. I messed around with the measurements and the ingredients until I had a muffin I really liked. I freeze them and take one out each morning to warm up in the microwave. I love the texture and the tiny bursts of just-enough-sweetness from the raisins!

Ingredients
4 medium very ripe bananas, mashed (I puree them in the Magic Bullet)
1/2 c. applesauce
1 egg
1 t. vanilla
1/4 c. honey

(dry ingredients are flexible. If I'm out of any of the various flours/bran, I just make sure I have 1 and 3/4 c. of some combination of them)

1 c. whole wheat flour (I like whole wheat graham flour)
1/2 c. whole wheat pastry flour
1/4 c. wheat bran
1 t. baking soda
1/2 c. raisins

Mix all wet ingredients in one bowl, and the dry in another bowl (including raisins). Dump dry ingredients into the wet ingredients and fold gently until completely moist. Divide into greased muffin tin cups (I get 11 muffins). Bake at 375 degrees for 25 to 30 minutes, or until toothpick comes out clean. If you let the muffins cool in pan for about 10-20 minutes, you should be able to gently pry/twist them out, then let them cool completely before putting in a ziplock gallon bag to freeze. Take one out in the morning, microwave for 45 seconds, and enjoy!

Homemade Pita Chips

Saturday, December 3, 2011


You gotta try these with my favorite homemade hummus!

A couple of years ago, my mom got me hooked on Stacy's Pita Chips. They are incredibly crunchy and tasty, and make you feel like you are eating something healthy. But if you actually look at the label, those pita chips are full of fat and sodium. And, they are really expensive! I started using whole wheat pita breads and thought I'd come up with something inventive...but the truth is, tons of people make these. It's all over the internet!

Now that I learned to make them, I make a batch at least once a week. You can flavor them any way you want, so there are a lot of variations to play around with.

Ingredients
pita pocket breads (any kind you want...I like whole wheat--you could get really motivated and make homemade pitas...hmmm...)
salt
spices

Use kitchen shears to cut the round pitas in half (if they are not already halved), and then into thirds, for a total of 6 triangles. Cut around the bottom edge of each triangle to separate the pocket. Take triangle pieces and lay them on a cookie sheet (what was the inside of the pocket should be facing up). Spray with a little oil, then sprinkle salt or seasonings--some good flavors are garlic, Italian herb, cumin, or try cinnamon/sugar. Get inventive! (sometimes when I'm feeling like something very plain, I only put oil on them). Bake at 350 degrees for 10-15 minutes, checking often. As soon as they start to get browned they are done. I've noticed that some get brown faster, so I take them out and put the rest back in.

Enjoy with dips, soups, or all by themselves!

Bread Twists

Thursday, December 1, 2011


I just can't stop making these awesome bread sticks! I discovered the recipe a few weeks ago on babycenter and have made them at least a half a dozen times already. They go well with just about anything, but especially soup and pasta. I can make the recipe JUST fit on one cookie sheet, as you can see above, although sometimes I have to get creative (like the "O" I made up there...my 3 year old, who is currently obsessed with the alphabet, claimed that one right away). ;)


Bread Twists (4Kowboys)

Ingredients

1 1/2 c. warm water

1 T. yeast

Let that sit for 5 minutes. Then add:

3 1/2 c. flour (I use 2 c. all purpose and 1 1/2 c. whole wheat)

1 t. salt


Mix until smooth, then let raise for 10 minutes. Roll out dough into a large square on a floured surface. Brush with melted butter mixed with garlic and then sprinkle with kosher salt. Fold in half and cut into 1 inch strips. Twist and place on a greased cookie sheet. Let sit for 15 to 20 minutes to raise. Bake at 400 degrees for 20 minutes or until golden brown. Immediately after baking, brush with more garlic butter and sprinkle with kosher salt (and parmesan cheese, if desired).

Dried or fresh chopped herbs like basil can be mixed into the dough for even more flavor!

Whole Wheat Bread

Wednesday, November 30, 2011

Another recipe I found on Babycenter, and I made just a few tiny changes (in parentheses) for my own taste. This is a really tasty, basic bread. I think it tastes good on its own, or with butter and/or jam. Dense and chewy, with just a hint of honey flavor. The vital wheat gluten can be found by the flour at the grocery store, and it really adds something good to the texture. I make this often!


Whole Wheat Bread
(Jtwinzz)

1 1/3 c. very warm water (110 degrees)
1 1/2 T. canola oil (I use 1 T)
2 T. honey (I use 3 T)
1 t. salt
2 t. rapid rise yeast
2 T. vital wheat gluten
3 1/4 to 3 1/2 c. whole wheat flour (I use 3 c.)

Combine water, oil, honey and salt and mix. Add 1 1/2 c. flour and mix well. Add yeast and vital wheat gluten and mix well. Add the rest of the flour gradually, adding the last 1/2 cup very gradually until dough 'cleans the bowl', if using a stand mixer. If mixing by hand, the dough should be just a bit sticky, but easy to manage with a bit of flour or non-stick spray on your hands.

Let rise until double in bulk (with instant yeast this will take 20-30 min). Form into a loaf (I put mine into a bread pan) and let rise again til double again (20-30 min-don't let it over rise or it may 'fall' while baking). Bake at 350 for 35 minutes.

Little*Garden*Kitchen Copyright © 2009 Designed by Ipietoon Blogger Template for Bie Blogger Template Vector by DaPino