Broccoli and Feta (or goat cheese) Pizza

Sunday, February 24, 2013


Just. Oh my. I about died when biting into this. I used goat cheese (my new absolute favorite) instead of the feta (though I ADORE feta as well). Yes, I get that it's probably a taste that not everyone is going to go for. But for me, the combination of garlic, broccoli, and goat cheese made my mouth almost explode. Yum. Yum. Yum. My oldest son adored it right along with me!

I used this dough for the pizza. I can't wait to make it again!


Broccoli and Feta Pizza

Ingredients:
Serves 4
– 1 lb. chilled pizza dough
– 1 1/2 cups cooked broccoli, chopped into bite-size pieces
– 1 Tbs. extra virgin olive oil
– 1 cup shredded mozzarella cheese
– 1/2 cup reduced fat feta cheese (crumbled)
– 1 Tbs. garlic, minced
– 1/2 tsp. salt
– 1/2 tsp. black pepper
– 1/4 cup all-purpose flour
Directions:
1. Pre-heat oven to 400 degrees. Prepare pizza stone or pizza pan by brushing a thin layer of extra virgin olive oil onto the stone or pan.
2. Coat dough and hands in the flour so that the dough does not stick to your hands. Roll out the dough until it is approximately 1/2 inch thick.
3.Using a pastry brush, brush the extra virgin olive oil all over the rolled out dough. Brush garlic evenly over the pizza. Sprinkle salt and pepper evenly. Spread cheese evenly over the pizza. Sprinkle broccoli* and feta cheese.
4. Bake for 10-15 minutes or until golden brown on the crust and the bottom . Once the top is a light golden brown, I like to slide the pizza off the stone or pan directly onto the oven grate so that the bottom of the pizza can get nice and brown.
5. Remove pizza from oven and let cool for about 5 minutes. Cut it up, pour yourself a glass of wine, pop in a movie, and you have yourself a perfect Friday night!
*Notes: In order to cook my broccoli, I usually steam it over the stove or in the microwave in a bowl of water. Before you put the broccoli onto your pizza, make sure that it has been drained, otherwise your pizza might be watery. I like to squeeze out the water by putting the broccoli onto a paper towel.

No-Bake Chocolate Chip Granola Bars

Wednesday, February 20, 2013


This recipe is handy because it's so quick. It is more like a sweet treat..kind of like a rice crispy treat..but it will do when Noah's begging for a granola bar and ingredients and time are running low!

I'm a firm believer that having a hand in making your own snacks
makes them taste even better!


No-Bake Chocolate Chip Granola Bars
(originally found at LaurensLatest.com)

Ingredients:

1/4 c. butter
1/4 c. honey
1/3 c. packed brown sugar
2 c. quick cooking oats
1 c. crispy rice cereal
1/2 t. vanilla
2 T. mini chocolate chipsps
In a large bowl, stir oats and rice cereal together. Set aside. In a small pot, melt butter, honey and brown sugar together over medium high heat until it comes to a bubble. Reduce the heat and cook 2 minutes. Pour in vanilla and stir. Pour over dry ingredients and mix well to moisten all ingredients. Pour into lightly greased small jelly roll pan {about 12x8x1} and press out to be about 3/4 inch in thickness. {If your pan isn't small enough, pack the mixture into one side. You really want to press them down so they stick together.} Sprinkle with mini chocolate chips and press down lightly. Cool on a countertop to room temperature for two hours or until the chocolate chips are set before cutting into bars. Wrap in parchment or plastic wrap and store at room temperature.
Recipe Notes: If your granola bars don't seem to be staying together when you cut them, you may have not boiled the mixture long enough...you want it to make it just past the softball stage. OR you made them too thin or you didn't pack them in tight enough. Stick them in the fridge for 20 minutes and that should help keep them together. {Be sure not to keep them in there too long or else they'll become super hard!} The next time you make them, try boiling for an extra 15 seconds or so.
Adapted from a recipe from Rachael Ray.

Banana Chia Pancakes

Saturday, February 16, 2013


Yes, I have a pancake obsession. I didn't use to--for years I might have pancakes once or twice a year. But having kids changed that; I now make pancakes at least once a week. Pancakes are the cure-all for on the go breakfast (freeze a bunch so that you can take one out and put it in the toaster right before you run out the door), or for lunch (since I run a daycare I've become sensitive to what lunches will please 'most'...and pancakes fit the bill). My blog now has several pancake recipes and I am constantly trying out new ones.

I like checking out all kinds of cookbooks for inspiration. This pancake recipe came from Karma Chow by Melissa Costello. I have friends who are going vegan, and I've become a little fascinated with vegan recipes (in case I need to cook for those friends some time...and just to have something new up my sleeve). My family loves meat, but I eat it rarely--we have frequent discussions about the various issues surrounding meat-eating, and we eat vegetarian meals a few times a week for supper. The fam has become accustomed to trying new things and are very open-minded about our meatless meals. I think I could easily go vegetarian (but man, the chicken...it would take some time to stop missing my chicken). Vegan though. I just don't know about giving up my cheese. And eggs. I could totally be a part-time vegan. Especially with some of the awesome recipes I've found.

So. These babies have a tropical flair with the coconut and banana taste. The chia seeds add the most subtle little bits for crunch. They are surprisingly awesome with maple syrup. What sold me, though? When my youngest son and my nephew sneaked into the leftovers I had on the counter and gobbled them up like they were candy. And considering they are pretty darn healthy, I was perfectly ok with that.


Banana Chia Pancakes

2 c. white whole wheat flour
2 T. chia seeds
1 t. baking soda
1 t. baking powder
1/2 t. salt
2 ripe bananas
2 T. agave nectar
1 1/2 c. coconut milk (I used lite)
1 t. cinnamon
1 t. vanilla extract

Place flour, chia seeds, baking soda, baking powder, and salt into a bowl and stir together . In a separate bowl, mash the peeled bananas into a paste. Add the mashed banana, agave nectar, coconut milk, cinnamon, and vanilla to the flour mixture and stir well to combine the batter. Heat a dollop of coconut oil (I just misted the pan with my mister like I usually do) on a nonstick skillet or griddle and pour the batter on it by 1/4 cups. Let the pancakes cook until bubbly and the edges are somewhat dry, and then flip over and brown on the other side. If the batter thickens up too much, add a touch more coconut milk (this is the result of the chia seeds gelatinizing).

note: original recipe called for gluten free flour, but we are not gluten free. You could use any type of flour you want.

Just Enough Wheat Pizza Dough

Thursday, February 14, 2013


As you can see--this dough recipe is the best one I've found for actually having ROUND pizza! And it tastes really awesome, too!

Now that we've been having homemade pizza on a pretty regular basis, I'm finding that it's very much a process that can be perfected over time. I've had some mishaps and some ugly pizzas turning out of this kitchen. Not that I seek perfection--but sometimes a nice-looking pizza that tastes great is a great way of feeling satisfied when you've sworn off the aesthetic perfection of processed, store-bought frozen pizzas.

I've made many different doughs and there are things I like about each recipe. Each has its own personality, its important features depending on what I need in a pizza at that time. When I've decided on pizza at the last minute, I use Perfect Pizza Dough, since it can be ready to go into the oven very quickly. If I have more time, I'll make Olive Oil Dough, or Whisk Dough. They need a bit of time to sit around.

I've discovered an awesome new dough recipe that I have a feeling I'm going to use a lot, because I love the flavor and texture. Here's the catch, though--it takes the most time of all. It rises for 12 to 24 hours!!! Wowsers. Definitely need to prepare ahead. However, that's not really so hard...if you make the dough while you are cooking supper one night and are already in the kitchen anyway, then set it aside, about 24 hours later you'll be in the kitchen again for supper and the dough will be ready. That's what I did, and I didn't even have to put the dough in the fridge. It was pillowy, bubbly and perfectly ready after 24 hours, covered, on the counter.

After rising for 24 hours, the dough was very workable. I was able to make nice, round pizzas easily. I didn't prebake the crust at all, but did put them in the oven right after putting on the toppings--a hint from the author of this recipe to avoid soggy crust. This recipe is really delicious and I'm so glad I found it.

Note: I do not have a food processor and I do this all by hand. The dough is amazingly easy to knead. I really didn't have to add any more flour as I kneaded; it has just the perfect amount of dry-to-wet ingredients to keep the hands relatively clean and to make the kneading a fun, relaxing process (I've been known to walk around the kitchen kneading in mid air while doing other important things. This type of multi-tasking can definitely be done with this recipe).

Whole Wheat Pizza Dough
from The Homemade Pantry by Alana Chernila

1 1/4 c. warm water
2 t. active dry yeast
1 t. sugar
2 1/3 c. unbleached all purpose flour
1 c. whole wheat flour (for added flavor, sub 1/2 c. with rye flour)
1 t. kosher salt
3 t. olive oil

1. In a liquid measuring cup, combine the warm water, yeast, and sugar. Let stand for 5 minutes, or until there is a bit of foam on the surface of the liquid.

2. If you are using a food processor, combine the flours, salt, and 2 t. of the olive oil in the bowl of the food processor and pulse to combine. With the machine running, add the yeast mixture as fast as the flour will absorb it. Process until the dough forms a ball and clings to the blade, then process for another 30 seconds. If you are working by hand, add the liquid slowly while kneading the dough in the bowl with the other hand, and then when the liquid is incorporated, knead on a floured surface for 5 minutes.

3. Use the remaining teaspoon of oil to grease a medium bowl and piece of plastic wrap large enough to cover the bowl. Place the dough in the bowl, cover it with the plastic, and leave in a warm place to rise for at least 12 hours, but up to 24 hours. It will get nice and bubbly.

4. Preheat oven to 475. Divide the dough into desired number of pizzas (I like to make four) and shape, flatten, roll into desired shape and thickness. Top with any number of variations of toppings.

5. Bake pizzas for 10 to 15 minutes.

Watch me make a round pizza for a change!
This dough is SUPER easy to work with. Not sticky at all. It begs to be patted into a perfect circle.


Before adding toppings, it wouldn't hurt to poke some holes into the crust to prevent bubbles from forming while baking.


Chickpea, Tomato, and Quinoa Soup

Monday, February 11, 2013


Oh me. Oh my. Yum. That is all I can really say! I love love love this!


Chickpea, Tomato, and Quinoa Soup (4 Servings)
½ cup quinoa
2 tablespoons olive oil
1 medium onion, chopped
1 carrot, halved lengthwise and cut into ½ -inch lengths
1 celery stalk, diced
2 chipotle peppers
4 garlic cloves, chopped
Salt and pepper
2 bay leaves
2 teaspoons sweet paprika
1 teaspoon ground cumin
4 cups vegetable broth
1 can (14.5 oz) crushed tomatoes
1 can (15 oz. or 1 ¾ cups) chickpeas, drained and rinsed if canned
¼ cup chopped flat leaf parsley, for garnish


In a Dutch oven or large soup pot, heat oil over medium.  Add onion, carrot, celery and garlic.  Season with salt and pepper, and cook for 5 min.  Add bay leaves, paprika, cumin, quinoa, broth and 1 cup water.  Bring to a boil, reduce to a simmer, and cook for about 20 minutes, or until quinoa is tender and the seed has opened up (each quinoa seed will look like it has a translucent halo around it when it's cooked completely; it will still be a little chewy).  Add tomatoes and chickpeas and cook for 20 minutes or until flavors have blended.  Discard bay leaves and sprinkle with chopped parsley before serving.

Crunchy Breadsticks

Saturday, February 9, 2013


I was so excited to find a recipe for breadsticks that turn out with a nice crispy crunch! I made them with black sesame seeds because, oddly enough, I had those on hand (from a recent fascination with homemade sushi). You could make the breadsticks plain, or use poppy seeds, or even roll in parmesan and garlic before baking. I plan to try a few different ways with these!

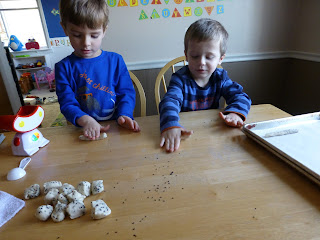
NOTE: This is the exact recipe from the Homemade Pantry. She has written it with the assumption that you have a stand mixer (which is fine, I wish I did have one, but I don't). I did everything by hand and it was not difficult. In fact I had helpers, as you can see from the pictures that follow. ;) Also, I cut the recipe in half with no prob.

Crunchy Breadsticks
(from The Homemade Pantry by Alana Chernila)

1/2 t. sugar
2 t. active dry yeast
2/3 c. warm water (between 100 and 110 degrees F)
2 c. (10 oz) all purpose flour
1 1/2 t. salt
2 T. olive oil
2 T. poppy or caraway or sesame seeds

1. Combine the sugar and yeast with the warm water in the bowl of a stand mixer (again, note that I do not have a stand mixer, and did everything by hand with no issues), and let sit for 5 minutes. It should be slightly foamy. Add 1 1/4 c. of the flour and the salt and olive oil. Mix for 5 minutes on medium speed using the paddle attachment.

2. Dust the counter with the remaining 3/4 c. flour. Turn the dough out onto the counter and knead the additional flour into the dough for 3 to 4 minutes, or until the dough is smooth and has lost most of its stickiness. Put the dough into a greased bowl, cover with plastic wrap, and allow it to rise until doubled in size. This will take 1 to 2 hours depending on the temperature in your kitchen.

3. Punch the air out of the dough with one swift punch, and turn the dough out on a floured counter again. Sprinkle the seeds onto the dough; then knead them into the dough for about 1 minute. Cover the dough with plastic and let rest for 5 minutes.

4. Remove the plastic wrap and set it aside. Divide the dough in half, then halves again, and then halves again. Repeat until you have 32 roughly equal pieces. Lay the plastic wrap over the balls of dough and set up your baking sheets, lined with parchment paper. Take each ball of dough, one at a time, and roll it between your hands until you have a breadstick that is about 8 inches long and no more than 1/2 inch in diameter. lay the breadsticks on the tray with 2 inches between them. Let rest uncovered for 30 minutes. Meanwhile, preheat the oven to 325.

5. Bake the breadsticks for 35 to 40 minutes, or util they are slightly golden. Let cool entirely before storing.

Storage: Room Temp: covered container, 7 days
              Freezer: freezer-safe container or bag, 3 months (recrisp in a 375 oven for 5 minutes)


Three Layer Mexican Pie

Wednesday, February 6, 2013


This is a recipe that I make when my freezer is running low on quickly-grab and eat meals. It is delicious and filling, and we enjoy a meal of it before I freeze the rest in individual portions for later.  I'm not sure if the family is sold on the whole 'faux cheese' idea, but adding a little shredded cheddar cures their hesitation quickly (and of course ends the 'vegan' status of the dish, but that's ok--none of us are actually vegan). I personally love to dabble in vegan recipes that rely on whole, healthy ingredients.

On a day when I know I'm gonna be famished for lunch, this is great to take from the freezer and warm up to eat with tortilla chips.


Three Layer Mexican Pie (fatfreevegan.com)
Bottom Layer:
Beans and corn
Mix together and layer in bottom of 9X13 baking pan:
1 can black beans (drained and rinsed)
1 can dark red kidney beans (drained and rinsed)
1 can sweet corn with peppers (drained and rinsed)
1 can chili beans in sauce (hot or mild)
1 TBS dehydrated onion flakes (or finely diced fresh)
Middle Layer:
Nacho Cheaze (based on recipe from Healthy Heart Foundation)
Combine in food processer or blender:
1 can great northern beans (drained and rinsed)
6 TBS nutritional yeast (not brewer’s yeast)
1/2 C salsa (hot or mild)
2 TBS lemon juice
1 tsp onion powder
1 tsp any type of prepared mustard
Blend until very smooth and creamy; pour over beans.
Top Layer:
1 bag of Hashbrown potatoes
I used Simply Potatoes Southwestern Hashbrowns but you can use regular hashbrowns mixed with 1 TBS chili powder
Spinkle hashbrowns over cheaze sauce
Bake at 375 F for 45 minutes or until hashbrowns are brown and cheaze is bubbly.

Little*Garden*Kitchen Copyright © 2009 Designed by Ipietoon Blogger Template for Bie Blogger Template Vector by DaPino